| HOME
ABOUT
FILMS
IMAGES
PROGRESS
COMIC
e-mail
|
Making Dreg
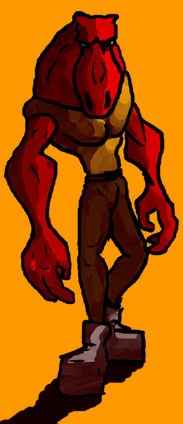
Dreg's a sorta horse face man. Why he's a horse face man is due
to his peculiar genetic history; he is half human, half alien,
which implies that someone had sex with an alien. I guess whatever
rocks your boat... and judging from Dreg, a pretty ugly alien
too. Some people are desperate I guess.
Anyway, I sketched him a lot, and I sketched him some more, because
let's face it, he's really cool and fun to sketch. The thing is,
eventually I was going to have to model him in glorious 3D, which
takes considerably more time than sketching him (by my calculations,
about 8928 times longer). Extra points to the person who figures
out how I reached that number.
|
|
| The
first model of Dreg was the one I made of him for the blocktest.
This was an interesting exercise- not only was it fun modeling in
low poly, but it showed up some of the limits in Dreg's design.
Namely, his arms were way too far back (you can see that in the
character sheet), and what with him having such a large barrel chest,
and dis-proportionally long forearms, it meant he couldn't possibly
reach across his chest and scratch his armpits. I figured that this
would lead to him being a moody, irritated person and I didn't want
that. So in the final model, his arms have been moved further forward
so that he can relieve any underarm itches he should come across.
Though, as I learned later, the arms would still be problematic.
Dreg doesn't actually have shoulders, which leads to whole lot of
headaches. But at the time I just figured I would burn that bridge
when I got to it.
Anyway, from the start, I had decided I wanted to model him NURBS.
I'd like to say that I regret that decision now, because it seems
fashionable to say that kind of thing, but despite the pain, the
huge amount of work, and the occasional gut wrenching scream (actually,
those were quite fun) I think in the end it was worth it.
|
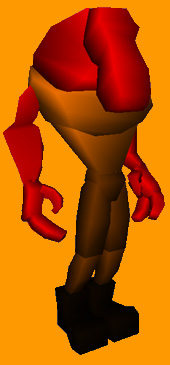
those arms are ridiculously far back...
|
| The
problems were many. His head is made up of a bunch of patches,
which are stitched together. The stitches so far seem pretty seamless,
though they do considerably slow down the performance, and can cause
weird deformations occasionally. I suggest the technique taught
by Miles, where you model the
basic shape out of a nurbs sphere then cut the patches from that.
Patches are necessary for things like eyes, and any area were you
need more detail (Dreg's ears and nostrils, for example). |

how's that for texturing?
|
| Then
I had to make his body. The torso was good fun, and he sort of grew
massive pecs (this is not the case in his earlier concept sketches-
the process of modeling him gave rise to this.) I know how it happened
too. While despairing about nurbs modeling (this tended to happen
at least 47 times a day) I searched the web for any tutorials on
full body nurbs modeling. Nothing came up, though I did see a picture
of a nurbs minotaur,
and I liked the pecs. That's how it happened. Ok? Good. (the site
with the minotaur is a gallery
of work by Jerome Desvignes) |
mostly armless
|
|
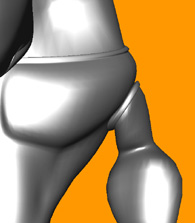
Then I had to do his crotch, and that god-damned arse of his.
Man was that a headache. He's got such a tiny waist... that arse
still pisses me off. Also, to get that shape to work in Nurbs
was horrifically painful, and I am still haunted by sights of
what the join between his crotch patch, and his leg patch looks
like at a certain, decisive point. This is why his trousers are
black. Of course, this was only the beginning of my long, painful
relationship with Dreg's arse. Don't read too much into that.
One useful tip: keep on using “global stitch” on patches,
to get a smooth seam , then delete history on both patches (so
as to cancel the stitch, but keep the smooth seam) then carry
on modeling... doing this often, and hours of control vertex pushing/pulling,
will lead to smooth seams between patches.
|
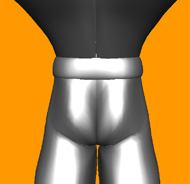
that god damned arse!
|
| Then
there were his arms, and namely, his shoulders, or lack of them.
I also needed to attach them to the torso. I had a vague idea of
how I would do this, but was a little unsure.
Miraculously (knowing 3D) it worked. Naturally, I'm a little
chuffed.
The problem with the torso is that it is simply a nurbs cylinder,
with a hole at the top for his neck, and a hole at the bottom
for his waist. I had no holes for his arms to pop out of, and
any attempt to cut one out and creat seamless patches was doomed
to total, humiliating failure. So I just kept the torso as it
was. Instead (non-animators please bare with me here, it gets
technical), I made a curve out of the end isoparm of Dreg's arm
(Edit Curves -> detach Surface Curves), then I made a duplicate
of the curve, scaled up the duplicate slightly, and projected
the new curve onto the torso. Then I simply created a loft between
the two curves, scaled up the inner hulls of the lofted surface
to give it form, and voila, a connection was made. It's important
never to delete history on the curves, so that the projected curves
stay on the torso and deform with it, and the curve made from
the arm stays on the arm... got all that?
For a long time, I tried to model his hands in nurbs, but that
was stupidly difficult, so I did them in polygons.
That's why Dreg now has weird black wristbands; they hide the
seams between his nurbs arms and polygon hands.
Anyway, I had a model, now I had to rig
the damn thing.
Arrgh (the primal screams started at around this point I recall.)
If I thought the modeling was bad, I had no idea what was coming.
|
where's the shoulder? In fact, what you see here is not how it
ended up... I needed to modify the arm model a little to avoid
scaring little children with horrible deformations when he bends
his arms...
|
| The
skeleton wasn't difficult to make.
I knew what kind of rig I wanted... it's a very simple rig, with
was much as possible available to me in the view I'm working on,
or sometimes the channel editor. I want to avoid having too many
controllable parts for him, but avoid making his potential movements
too limited. I had to add collarbones to help him reach things far
away from him (like his armpits).
A good example of how I like my rigs is what I've done for his
legs. I have an inverse foot so as to easily control foot bend
and toe roll, as well as being able to keep the ankle rotation
constant (like, for instance, when his foot is on the floor) and
controlling the leg IK. This is
controlled by a proxy object (a sphere) which controls the inverse
foot's position and rotation, and who's scaleX and scaleZ attributes
control the toe roll and foot bend. Also, the pole vector for
the leg IK is controlled by a locator which is parented to the
aforementioned sphere. This means that I can control nearly all
leg movements through this sphere alone, meaning I only need to
set keys for one object rather than several.
|
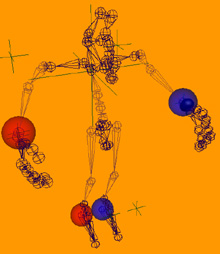
Eurg... Dreg's skeleton...
|
| The
real problem was skinning.
It's a good thing I experimented a lot before doing all this
(I definitely recommended thoroughly researching any technique
you're going to use before spending months modeling a model doomed
to failure). With stitched patches, it's important you select
all patches when you stitch them, not a few at a time. Otherwise,
problems will arise when you try to skin the patches to a skeleton.
Blendshapes, on the other hand,
seem to work fine either way.
I was warned that painting weights was risky with nurbs patches,
because you had to make sure that the weight was exactly the same
on either side of a seam. Some horrible, gut wrenching things
were mentioned about the component editor... not to mention that
I hate painting weights at the best of times. I hoped to find
a technique that would avoid painting weights all together.
I started with the hardest part; namely, that god-damned arse.
I remembered a tutorial Adam Vanner
had given us in the second year, where you made a blendshape for
the crotch and part of the leg, which changed depending on how
much the leg bone rotated. Then this was used as an influence
object for the leg, and it worked really well. It took me
ages to get it to work. At one low point, I trudged all the way
into university, then hunted Adam down and asked him why it wasn't
working. The solution was obvious really; I had to go into the
attribute editor for the effected skin clusters and turn on “use
components”. Man, why didn't I think of that? And here I
was thinking it would be something really obscure and unintuitive.
Skin clusters. Components. Yeah.
Anyway, that technique didn't work- you see, it's great for rotating
the leg in one plane of rotation, but then try rotating it in
another dimension, and everything goes to pot. I started trying
to figure out how I could get the influence object to know which
blendshape to use depending on how the leg was rotated, but it
fried my brain. My flatmate Adam
Cubitt was trying to think of a clever way to get Euler rotation
coordinates of the bone into one variable that could be used to
drive the blendshapes, going on about scary things like quaternions
an other horribleness, until I decided I wanted to go for another
technique.
|
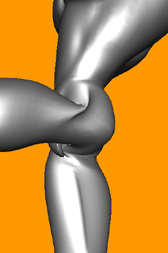
the horrible arse deformations at the beginning
of my soul destroying journey towards a rigged Dreg...
|
| This
new technique, on the other hand, worked really well, and I never
had to paint a single weight. I just used multiple influence objects,
and used driven keys to modify their rotation/position/scale (but
not their components) depending on leg rotation. The advantage being
that some of these could be parented to different joints, thereby
working no matter what angled the leg was at. It worked. The screams
lessened in volume for a while. Also, because the skin clusters
aren't “using components” (I eventually figured out
that if you turned this on, the skin would also be effected if you
moved the components of the influence object (duh!) as well as rotation/translating/scaling)
it's very fast. In actual fact, the influence objects act just like
bones, and scaling them, for instance, works just like scaling a
joint. The shape of the influence object merely decides what parts
of the skin are effected by it. In fact, when you paint skin weights,
influence objects appear in the joint list as if they were joints.
There you go. It's simple, it works, and doesn't require paint.
So I simply used the same technique for the torso (hehehe “simply”
he says...). I'll spare you the details of what that was like
(the screams got considerably loud at this point).
Then I added blendshapes for the
head. This was really easy in comparison to everything else. Blendshapes,
yeah... cool.
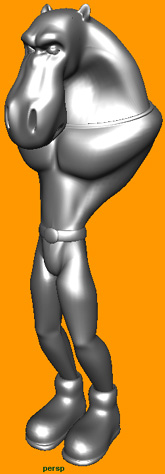
Anyway, I did a render
of the final model posing. He looks like a right show off.
Then as for texturing... shut up! Who needs textures? Bah! Had
enough. Need to move on...
In any case, I learned a huge amount modeling Dreg. Maybe, if
I have the time and am feeling generous, I could write a couple
of tutorials (I know I really could have used a few...). But that
sounds awfully like hard work...
Since writing this page I've had to make a few changes to Dreg's
head. You can read about them here.
|

Dreg's fifty million influence objects... despite
the number of them, this technique proved to be very fast- I
can animate with the full res model (but with a proxy head;
the real slowdown is the stitching on the head patches...)
|
|