| HOME
ABOUT
FILMS
IMAGES
PROGRESS
COMIC
e-mail
|
Making the Goon
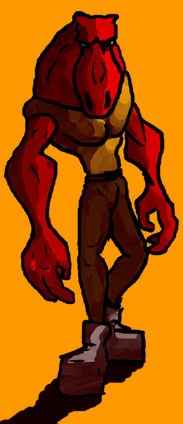
Character design was easy for this character. He was to be the
generic goon, the gorilla in a suit, the man who isn't paid to
think. As a side note, some of you may be wondering why these
guys are chasing after Dreg in the first place. In the early storyboards,
I had a sequence where Dreg (as part of his mercenary work) had
to assassinate the boss of these men, and the chase scene is what
happens immediately after Dreg does this, then falls from the
rafters...
|
|
|
After the painful journey that was creating
and rigging Dreg, I wanted to keep this one simple. I decided
to model him in polygons, for several reasons. There were the
practical ones; it's much quicker to model in polygons than nurbs,
and also it's a lot quicker to render... Also, I feel that polygons
work for this character; the sort of jagged, rugged look. In fact,
I decided not to smooth the model, keeping the low poly version. Also,
you can see in the blocktest that the goons rarely get particularly
close to camera, so another reason to avoid unnecessary detail.
The only exception was the head. Initially, the head was also
made out of polygons, but I realized this caused annoying problems
with the renderer when it came to shadows. Also, I felt he actually
looked too intelligent, so I wanted to change his head. I remodeled
the head in NURBS, and I think he looks much better now.
|

His head, before and after. I far prefer him now
(he looks stupid enough).
|
| Rigging
was relatively simple (read “horribly painful, but not quite
as bad as Dreg”) and I used exactly the same techniques as
I did on Dreg. The same basic rig, and lots of influence objects.
Collar bones are amazing. They really add to the variety of poses
a character can make, and solve a lot of problems. They control
where the shoulder goes, and I could have the position and other
attributes of the torso influence objects be driven by the rotation
of the collar bones. This meant I had much more control on the torso
skinning, and despite it being low poly, I think it works pretty
well. |
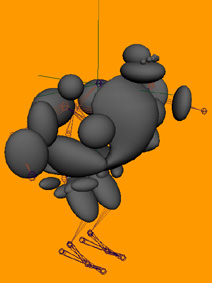
His somewhat bulkier influence objects...
|
| The
only problem (hahaha... “only” he says...) with my keeping
the low poly model, is that it had loads of dodgy polygons that
weren't happy with having more than three edges. As I've mentioned
elsewhere on this site, polygons like to be triangles, and even
if they aren't triangles, they'll sneakily turn into them when you
aren't looking. For example, if I have a polygon made with four
points that aren't on the same plane, it gets rendered as two triangles.
There are two possible sets of triangles for each four edged polygon
(depending on which diagonal you use), and the renderer will pick
one of these sets. The problem, though, is that if you then skin
a model with lots of these dodgy polygons, as the model deforms,
the renderer might decide to use a different set of triangles, and
you get things popping in and out and other horribleness. I know
this was probably totally unclear, but animators know what I'm talking
about. |
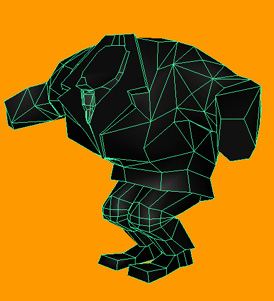
The body in all its glorious low polyness
|
|
This meant I had to add lots of extra edges, and I had to be
careful where I put them to make sure I didn't get particularly
nasty deformations (such as gaping holes appearing in his body...).
When it came to the hands, which were full of these problems,
I felt too lazy to do it all manually, so I used Maya's “triangulate”
command to convert all of the polygons to triangles. I think this
is probably a bad thing; it tends to be a lot less efficient than
if you do it yourself. But I'm not all that desperate to keep
the poly count low, and besides, I'm lazy. Still, I felt guilty.
I've never felt guilty about triangulation before.
|

The triangulated hand... I repent!
|
| Then
for the head I did something which, if I weren't so modest, I'd
describe as incontestable proof of my genius, but I'll refrain myself.
I skinned the head to just one joint, and controlled all the facial
transformations through influence objects alone. I played around
with this for a while, and it's much more fun, intuitive and fast
than using blend-shapes, in my opinion. Naturally it has its disadvantages,
but I can't think of them right now. In any case, I think I'm going
to do the same with Dreg's head, because let's face it, I absolutely
love rigging. |
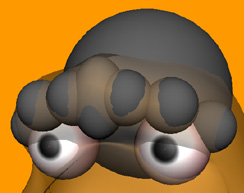
The influence objects around his brow. Incontestable
proof of my genius, is what I would say if I were conceited.
|
| In
any case, rigging these characters has sucked the life force out
of me, leaving me an empty shell of a man, incapable of emotion
and almost no capacity for thought. That's why I'm working on the
website now. |
...
I'm feeling too lazy to stick an image here... have a look at
this high-res one I made...
...
|
|